Facility Name

External users: registration to be carried out only through I-STEM portal
Additional information about sample and analysis details should be filled in the pdf form provided in the I-STEM portal under “DOWNLOAD CSRF”
Internal users (IITB): registration to be carried out only through DRONA portal
Additional information about sample and analysis details should be filled in the pdf form provided here.
.
Category
- Fabrication and Processing » Nanofabrication
Booking Details
Facility Management Team and Location
Department of Mechanical Engineering
Contact: +91-22-25767529
Email Id: rakesh.mote@iitb.ac.in
Facility Features, Working Principle and Specifications
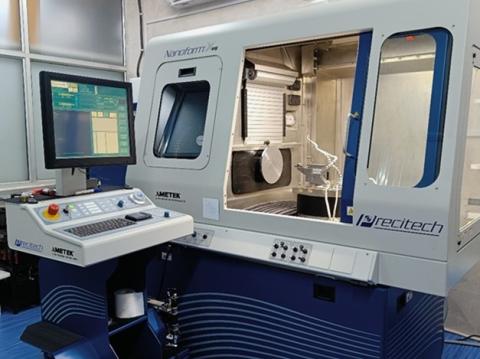
Nanoform X ultra grind is the small-frame ultra-precision machine equipped with pneumatic vibration isolation and a fully flood coolant system. The key features of the facility are the use of air-bearing spindles, pneumatic slides, and a feedback control system that helps in achieving precision movement and accuracy. The machine is designed for diamond turning, which is used to fabricate different components with precision-finished surface quality, having surface roughness in the nanometric level and form accuracy in the sub-micron range. Silicon and other difficult-to-machine materials can be manufactured efficiently with high surface quality using this facility.
Diamond turning machine (DTM) uses a sharp-tipped diamond tool, either natural or synthetic, to manufacture precision components with very high surface quality. The process is capable of producing ultra-smooth surfaces that do not require additional polishing. In DTM, the workpiece is mounted on a spindle with rotational motion, and the diamond tool is attached to the tool holder subjected to linear motion. The material removal from the workpiece takes place owing to relative motion between the diamond tool and the workpiece. Surface quality of the work sample is dependent on the tool specification, machining parameters, and material properties.
- Surface roughness (Sa) - 1.5 nm or less
- Form accuracy (P-V) - 0.15 µm or less
- Swing capacity (X and Z axes) - 440 mm
- Position feedback resolution - 8 pm (0.008 nm)
- Programming resolution - 0.01 nm
Sample Preparation, User Instructions and Precautionary Measures
Charges for Analytical Services in Different Categories
The charges are in INR per hour of usage of the DTM
| CATEGORY | USER CHARGES Per Hour |
| IITB Users | ₹ 800/- |
| Other Academic Institutes | ₹ 1600/- + 18% GST |
| National Labs | ₹ 4000/- + 18% GST |
| Industries | ₹ 8000/- + 18% GST |
| Start-up (SINE) | ₹ 4000/- + 18% GST |
| IITB Monash | ₹ 800/- + 18% GST |
| SAARC/African | Academic - ₹ 4000/- |
| Industry - ₹ 8000/- | |
| Other Countries | Academic - ₹ 8000/- |
| Industry - ₹ 16000/- |
Notes:
• The time slot is inclusive of tool setting time, work balancing time, and machining time.
• The above charges are exclusive of materials and tooling/fixturing costs.
• Additional software support for programming as required for Slow Tool Servo (STS) and aspheric/free form machining will be charged 25% extra of the above charges per hour
Applications
- Freeform and aspheric optics
- Mirrors/reflectors
- Lenses
- Aerospace components
- Functional structured surfaces
- Biomedical implants
- Lasers
- Medical devices
- Automotive parts
- Semiconductors
- Precision molds
- Defence equipment
- Display systems
- Scientific research instruments
- Video surveillance systems
