Category
- Microscopy and Imaging » Confocal Microscopy
Booking Details
Facility Management Team and Location
Facility Features, Working Principle and Specifications
Confocal Microscopy
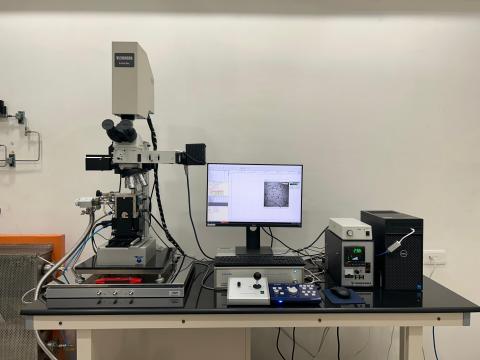
In confocal microscopy, laser light is focused by an objective lens on to the object, and the reflected beam is focused onto a photo detector via a beam splitter. An image is built up by scanning the focused spot relative to the object, which is then stored in an imaging system for subsequent display. Through the use of a confocal pinhole, only light incident from the focal plane is permitted to pass through to the photo detector. Light not returning from the specific optical plane is blocked by the pinhole. Hence, an extremely thin optical section is created, providing a high-resolution image. Because thermal radiation is also blocked by the confocal pinhole, only the polarized reflection of the high intensity laser beam reaches the imaging sensor and a sharp image is produced. The use of pinhole optics increases the resolution such that with a 0.5 mm diameter beam,
Magnifications up to 500× at a resolution of 500 nm can be obtained, using a He–Ne laser with a wavelength of 632.8nm. In the system used a laser beam, 0.5mm diameter is reflected and scanned by an acoustic optical deflector in the horizontal direction at a rate of 15.7 kHz and a galvano mirror in the vertical direction at 60Hz. Specimens are placed at the focal point of a gold plated ellipsoidal cavity in an infrared furnace beneath a quartz view port.
Experimental Setup
Laser Specifications
- Laser source: He-Ne (Visible laser Wavelength (λ) = 632.8 nm)
- Power: 1.5 kW
Heating Setup
- Heating Source: IR heating by halogen lamp
- Maximum temperature: 1700°C
- Inert atmosphere: Ar gas
Additional Specifications
- Resolution: 0.5 µm
- Controlled heating & Controlled cooling rate
- Rapid cooling achieved by controlled He gas flow rate
Instructions for Registration, Sample Preparation, User Instructions, Precautionary Measures and Charges
Online Registration
Registration is online through the Drona interface.
Intimation of the appointment will be sent by email.
Sample Specifications
The sample should be flat and mirror finish without any scratches.
- Cylindrical Sample (Large alumina crucible):
- Diameter: 6.5 mm
- Height: 3.9 mm
- Cylindrical Sample (Small alumina crucible):
- Diameter: 5 mm
- Height: 3.7 mm
- Rectangular Sample (Big crucible):
- Length: 5 mm
- Width: 4 mm
- Thickness: 3 mm
We shall accept online registration only through the IRCC webpage. If you need to cancel your slot, send an email immediately to with an explanation.
- Slots will be provided on a first-come-first-served basis.
- USB drives are strictly prohibited for copying data to minimize virus-related issues. You are requested to bring a new blank CD to transfer your data. All data must be transferred within 7 days of imaging. Without exception.
- Users must be present during the entire slot.
Applications
In-Situ Real-Time Studies
- Samples: metallic, semiconductor and non-metals
- In-situ real-time studies of phase transformations during heat treatment.
- Grain growth, sintering, precipitate formation at elevated temperatures.
- Inclusion behavior in molten liquid metals and phase transformations in solid-state metals.
- Solidification of metals and fluxes.
- Interaction between liquid metal, slag & refractory.
